Google Maps and Flutter
This article will show you step-by-step how to add a Google Map widget to your Flutter application.

Adding Google Maps to Flutter
This article was last updated on 03/19/19. The API for this plugin changed to be more idiomatic to Flutter. The article now reflects those API changes. Note that this plugin is still in Developers Preview.
This article shows you step-by-step how to add a Google Map widget to your Flutter application. Here’s what you’re going to build today:
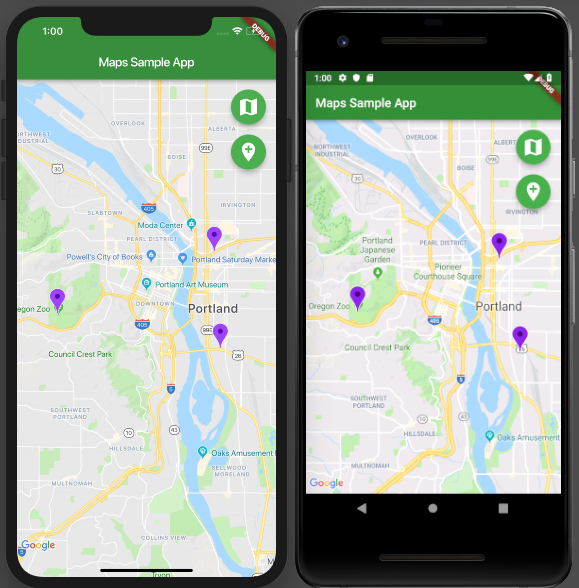
Setup
The first step is to add the Google Maps Flutter plugin as a dependency in the pubspec.yaml
file. The package is available as google_maps_flutter
on pub.dartlang.org.
dependencies:
  ...
  google_maps_flutter: ^0.4.0
Once you do that, you need to run flutter packages get.
The next step is getting an API key for both Android and iOS. For Android, follow the instructions at
Maps SDK for Android — Get API Key. Once you have your API key, add it to your Flutter app in the application manifest (android/app/src/main/AndroidManifest.xml), as follows:
<manifest ...
  <application ...
    <meta-data android:name="com.google.android.geo.API_KEY"
               android:value="YOUR ANDROID API KEY HERE"/>
For iOS, follow the instructions at Maps SDK for iOS — Get API Key. Once you have this key, add it to your Flutter app in the application delegate (ios/Runner/AppDelegate.m):
#include "AppDelegate.h"
#include "GeneratedPluginRegistrant.h"
// Add the GoogleMaps import.
#import "GoogleMaps/GoogleMaps.h"

@implementation AppDelegate

- (BOOL)application:(UIApplication *)application
    didFinishLaunchingWithOptions:(NSDictionary *)launchOptions {
  // Add the following line with your API key.
  [GMSServices provideAPIKey:@"YOUR IOS API KEY HERE"];
  [GeneratedPluginRegistrant registerWithRegistry:self];
  return [super application:application didFinishLaunchingWithOptions:launchOptions];
}
@end
On iOS, you also need to add a setting to the app’s Info.plist file (ios/Runner/Info.plist). This entry forces Flutter on iOS into a single threaded mode, which is required for the platform view embedding to work. This technical restriction is being worked on and will be lifted before Google Maps moves out of Developer Preview.
Add a boolean property with the key io.flutter.embedded_views_preview and the value true:
<key>io.flutter.embedded_views_preview</key>
<true/>
Adding a GoogleMap widget
Now you are ready to add a GoogleMap widget! Run flutter clean to make sure the API key changes are picked up on the next build. Then, add a GoogleMap widget that covers the entire screen:
import 'dart:async';
import 'package:flutter/material.dart';
import 'package:google_maps_flutter/google_maps_flutter.dart';
void main() => runApp(MyApp());
class MyApp extends StatefulWidget {
@override
_MyAppState createState() => _MyAppState();
}
class _MyAppState extends State<MyApp> {
Completer<GoogleMapController> _controller = Completer();
static const LatLng _center = const LatLng(45.521563, -122.677433);
void _onMapCreated(GoogleMapController controller) {
_controller.complete(controller);
}
@override
Widget build(BuildContext context) {
return MaterialApp(
home: Scaffold(
appBar: AppBar(
title: Text('Maps Sample App'),
backgroundColor: Colors.green[700],
),
body: GoogleMap(
onMapCreated: _onMapCreated,
initialCameraPosition: CameraPosition(
target: _center,
zoom: 11.0,
),
),
),
);
}
}
Important bits:
-
onMapCreated: method that is called on map creation and takes a MapController as a parameter.
-
initialCameraPosition: required parameter that sets the starting camera position. Camera position describes which part of the world you want the map to point at.
-
mapController: manages camera function (position, animation, zoom). This pattern is similar to other controllers available in Flutter, for example TextEditingController.
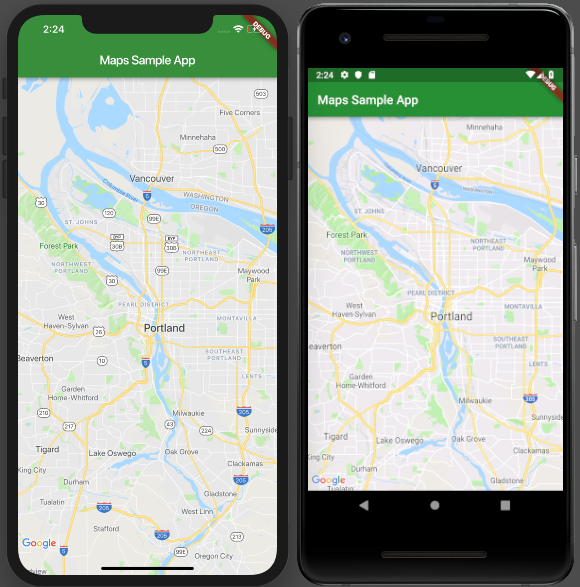
If you run your app at this point, it should look like this:
Upgrading to Google Maps SDK for iOS 3.0
After running your app in the last step, you may have seen the warning: “New version of Google Maps SDK for iOS available: 3.0”. This is because Flutter supports a minimum of iOS version 8, while the latest version of Google Maps SDK for iOS supports minimum iOS version 9. In order to use the latest version of Google Maps SDK for iOS, we need to raise our iOS for Flutter minimum version to 9.
Declare a minimum platform version of 9.0 by uncommenting this line in ios/Podfile:
platform :ios, ‘9.0’.
Then run (cd ios && pod update) from command line to pull the newest version of the Google Maps SDK for iOS.
Next, return to your main project directory (cd ..) and run open ios/Runner.xcworkspace/ from command line. This will open the iOS Runner Xcode project, where we need to set the Deployment Target iOS version to 9.0.
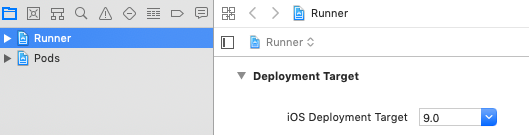
Run your app again, and verify the new version available warning is no longer there.
What can you do with a Google Map?
So now you have Google Maps in your app, but you probably want to do something more interesting. What about putting Flutter widgets on top of the map, changing the map’s appearance, or adding place markers to the map? You can do it all!

Add a widget on top of the map
It’s important to remember that the GoogleMap widget is just a Flutter widget, meaning you can treat it like any other widget. This includes placing another widget on top of it. By placing the GoogleMap widget inside of a Stack widget, you can layer other Flutter widgets on top of the map widget:
body: Stack(
  children: <Widget>[
    GoogleMap(
      onMapCreated: _onMapCreated,
      initialCameraPosition: CameraPosition(
        target: _center,
        zoom: 11.0,
      ),
    ),
    Padding(
      padding: const EdgeInsets.all(16.0),
      child: Align(
        alignment: Alignment.topRight,
        child: FloatingActionButton(
          onPressed: () => print('button pressed'),
          materialTapTargetSize: MaterialTapTargetSize.padded,
          backgroundColor: Colors.green,
          child: const Icon(Icons.map, size: 36.0),
        ),
      ),
    ),
  ],
),
Change the map’s appearance
Right now, the added button doesn’t do anything interesting. Change that so that when pressed, the button toggles between two different map types: normal view and satellite view.
To do this, create a variable _currentMapType to keep track of the current map type. Add
mapType: _currentMapType to the GoogleMap widget.
MapType _currentMapType = MapType.normal;
@override
Widget build(BuildContext context) {
return MaterialApp(
...
GoogleMap(
...
mapType: _currentMapType,
),
);
}
Now, add a method that will modify the value of _currentMapType inside of a setState()
call. This will update the appearance of the map to match the new value of _currentMapType.
void _onMapTypeButtonPressed() {
  setState(() {
    _currentMapType = _currentMapType == MapType.normal
        ? MapType.satellite
        : MapType.normal;
  });
}
Finally, replace () => print(‘button pressed’) with _onMapTypeButtonPressed.
child: FloatingActionButton(
  onPressed: **_onMapTypeButtonPressed,
  ...**
),
Add a marker
How about creating another button that, when pressed, adds place markers to the map. Following the same pattern as before, add a button to the stack. Place another FloatingActionButton inside the Align widget from the build method. You’ll need to wrap both FloatingActionButtons in a Column widget:
Align(
 alignment: Alignment.topRight,
 child: Column(
   children: <Widget>[
     FloatingActionButton(
       ...
     ),
     SizedBox(height: 16.0),
     FloatingActionButton(
       onPressed: _onAddMarkerButtonPressed,
       materialTapTargetSize: MaterialTapTargetSize.padded,
       backgroundColor: Colors.green,
       child: const Icon(Icons.add_location, size: 36.0),
     ),
   ],
 ),
),
To implement the _onAddMarkerButtonPressed method, we need to do a couple things. First, create a variable called
_markers to store the map’s markers. Set this as the markers property of the GoogleMap widget.
final Set<Marker> _markers = {};
@override
Widget build(BuildContext context) {
return MaterialApp(
...
GoogleMap(
...
markers: _markers,
),
);
}
To add a marker in the center of the map, we need to track the map’s current camera position. Add the following code to do that:
LatLng _lastMapPosition = _center;
void _onCameraMove(CameraPosition position) {
_lastMapPosition = position.target;
}
@override
Widget build(BuildContext context) {
return MaterialApp(
...
GoogleMap(
...
onCameraMove: _onCameraMove,
),
);
}
Now, we can add a marker to the map by modifying the content of _markers inside of a setState()
call.
void _onAddMarkerButtonPressed() {
  setState(() {
    _markers.add(Marker(
      // This marker id can be anything that uniquely identifies each marker.
      markerId: MarkerId(_lastMapPosition.toString()),
      position: _lastMapPosition,
      infoWindow: InfoWindow(
        title: 'Really cool place',
        snippet: '5 Star Rating',
      ),
      icon: BitmapDescriptor.defaultMarker,
    ));
  });
}
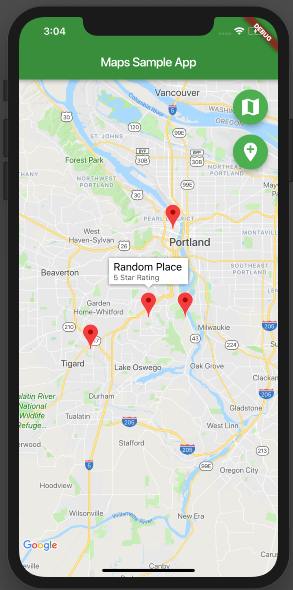
You can customize the markers with different colors, for example BitmapDescriptor.*defaultMarkerWithHue*(BitmapDescriptor.*hueViolet*),
or even with custom icons, for example BitmapDescriptor.fromAsset(‘assets/asset_name.png).
Final main.dart code
import 'dart:async';
import 'package:flutter/material.dart';
import 'package:google_maps_flutter/google_maps_flutter.dart';
void main() => runApp(MyApp());
class MyApp extends StatefulWidget {
@override
_MyAppState createState() => _MyAppState();
}
class _MyAppState extends State<MyApp> {
Completer<GoogleMapController> _controller = Completer();
static const LatLng _center = const LatLng(45.521563, -122.677433);
final Set<Marker> _markers = {};
LatLng _lastMapPosition = _center;
MapType _currentMapType = MapType.normal;
void _onMapTypeButtonPressed() {
setState(() {
_currentMapType = _currentMapType == MapType.normal
? MapType.satellite
: MapType.normal;
});
}
void _onAddMarkerButtonPressed() {
setState(() {
_markers.add(Marker(
// This marker id can be anything that uniquely identifies each marker.
markerId: MarkerId(_lastMapPosition.toString()),
position: _lastMapPosition,
infoWindow: InfoWindow(
title: 'Really cool place',
snippet: '5 Star Rating',
),
icon: BitmapDescriptor.defaultMarker,
));
});
}
void _onCameraMove(CameraPosition position) {
_lastMapPosition = position.target;
}
void _onMapCreated(GoogleMapController controller) {
_controller.complete(controller);
}
@override
Widget build(BuildContext context) {
return MaterialApp(
home: Scaffold(
appBar: AppBar(
title: Text('Maps Sample App'),
backgroundColor: Colors.green[700],
),
body: Stack(
children: <Widget>[
GoogleMap(
onMapCreated: _onMapCreated,
initialCameraPosition: CameraPosition(
target: _center,
zoom: 11.0,
),
mapType: _currentMapType,
markers: _markers,
onCameraMove: _onCameraMove,
),
Padding(
padding: const EdgeInsets.all(16.0),
child: Align(
alignment: Alignment.topRight,
child: Column(
children: <Widget> [
FloatingActionButton(
onPressed: _onMapTypeButtonPressed,
materialTapTargetSize: MaterialTapTargetSize.padded,
backgroundColor: Colors.green,
child: const Icon(Icons.map, size: 36.0),
),
SizedBox(height: 16.0),
FloatingActionButton(
onPressed: _onAddMarkerButtonPressed,
materialTapTargetSize: MaterialTapTargetSize.padded,
backgroundColor: Colors.green,
child: const Icon(Icons.add_location, size: 36.0),
),
],
),
),
),
],
),
),
);
}
}
What else can you do?
Once again, the GoogleMap widget is just a widget**.** This means you can place widgets on top of it (like you just did), you can place it inside other widgets (like a ListView, for example), or if you’re feeling a bit wild, you could even place it in a Transform widget*.

The possibilities extend as far as you’d like to take them. Checkout the Place Tracker app in flutter/samples for a more complete Google Maps demo. You can also checkout the google_maps_flutter plugin example app for a demonstration on using the plugin.
*Using a transform widget to rotate the map is currently not supported on iOS. It might be in the future, but it is not the biggest priority for the plugin at this time.
More from Flutter

Meet the Flutter Extension for Gemini CLI
Build high quality, feature rich apps with the new Flutter Extension for Gemini CLI

Unleash new AI capabilities for Flutter in Firebase Studio
Flutter development just got a lot smarter in Firebase Studio! At I/O Connect India, we unveiled new AI-powered features designed to give…