

How to debug layout issues with the Flutter Inspector
Exploring why they occur and how to solve them

Note: Being familiar with
Row,Column, andExpandedis useful, but not required, for this article.
As a Flutter developer, you’ve probably run into issues where an image is cut off (or not even visible) on your app. Maybe you got the “viewport was given unbounded height” error.” In fact, the two most frequent types of Flutter errors are both problems with layout: widget overflow and “renderbox not laid out” issues. You’re not alone in running into layout problems, but, where do you go to solve them?
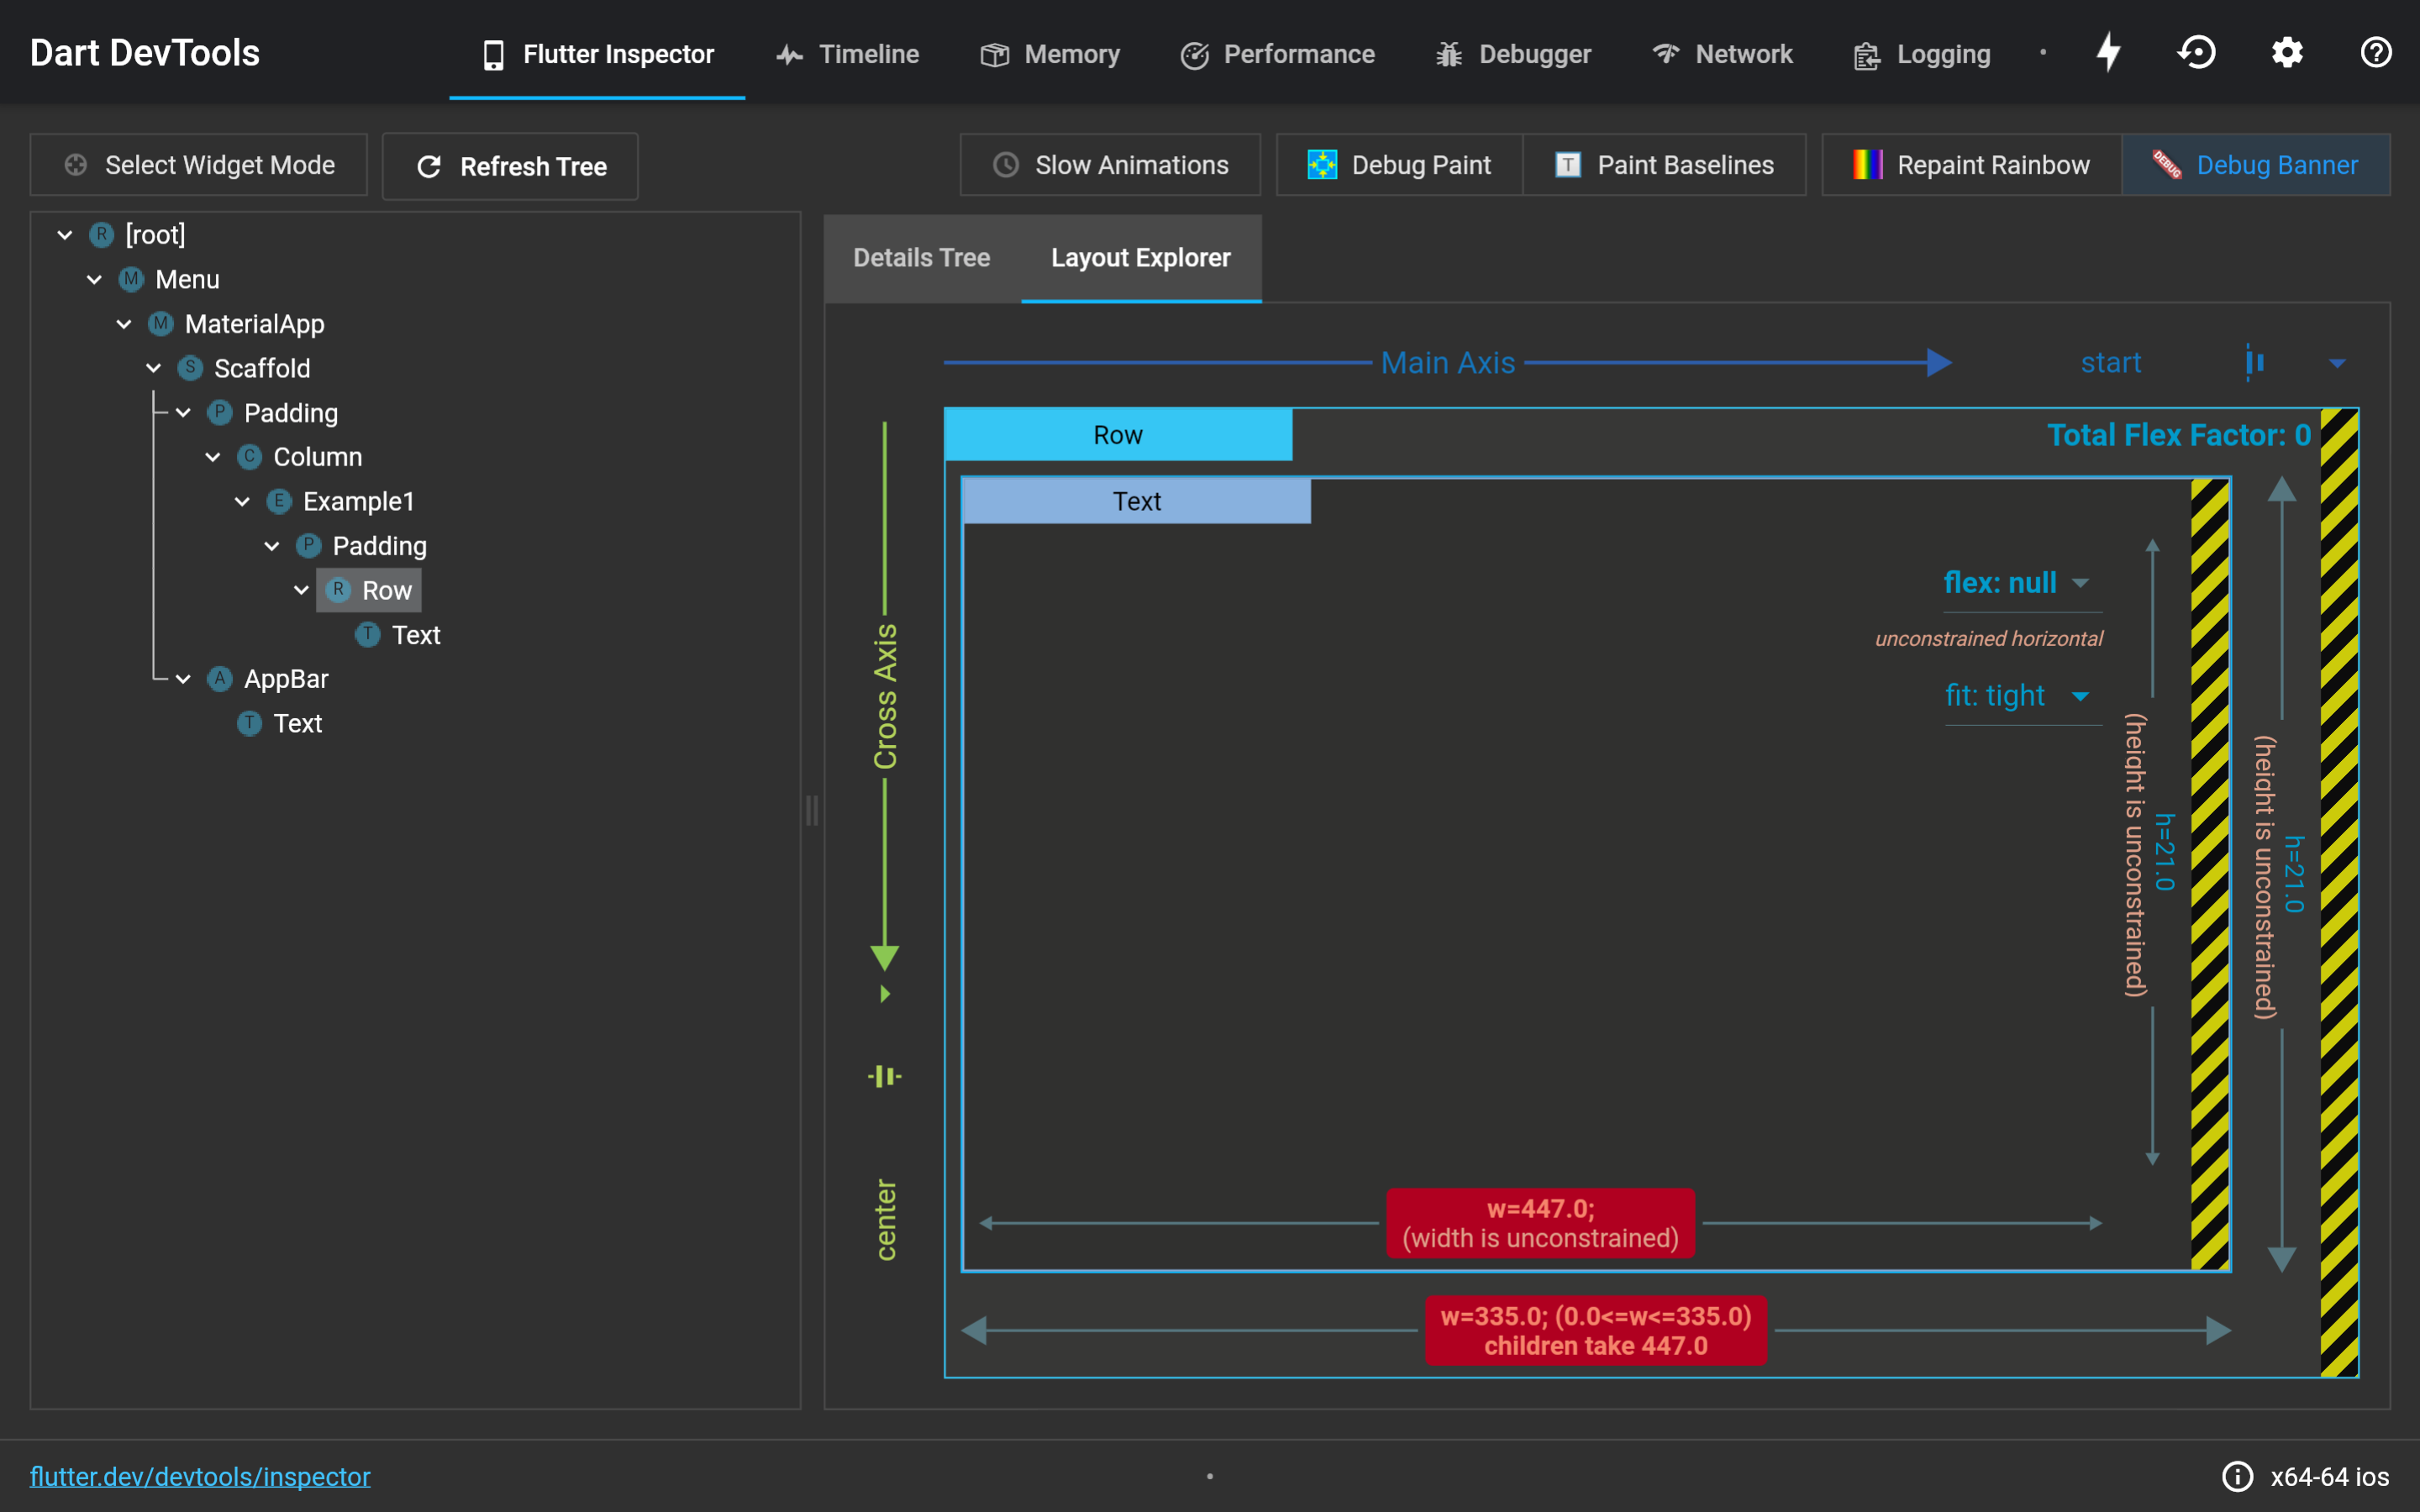
Fortunately, the Dart DevTool’s Flutter Inspector can help you understand why they occur and also how you can solve them. In this article, you learn how to use the tool by debugging 3 common layout issues. So, the next time you encounter an issue, you can solve it like a pro!
Table of Contents
What is the Flutter Inspector?
The Flutter Inspector is a tool (part of the Dart DevTools suite) for exploring and visualizing widget trees. It’s perfect for discovering the ins and outs of your app layout. Take a peek at the tool in the following GIF:
With the inspector, you can select widgets on the app or even remove the debug banner. It’s got you covered whether you’re wondering why your widget is invisible or curious about how adding flex to a Row’s child affects the UI. The article focuses on the following features:
-
Details Tree — Enables you to examine the properties of each widget. You can examine a widget’s actual size and see how constraints are passed down from the parent widget.
-
Layout Explorer — Enables you to visualize
Flexwidgets (Row,Column,Flex) and their children. Adjusting the flex, fit, and axis alignment allows you to see the changes on your running app.
At this point, you might be wondering, “How do I try this awesome tool?” Just run Dart DevTools on the app, and the Inspector is the first tool you see. For more information, see how to run Dart DevTools from your IDE or the command line.
The debugging adventure 🤠
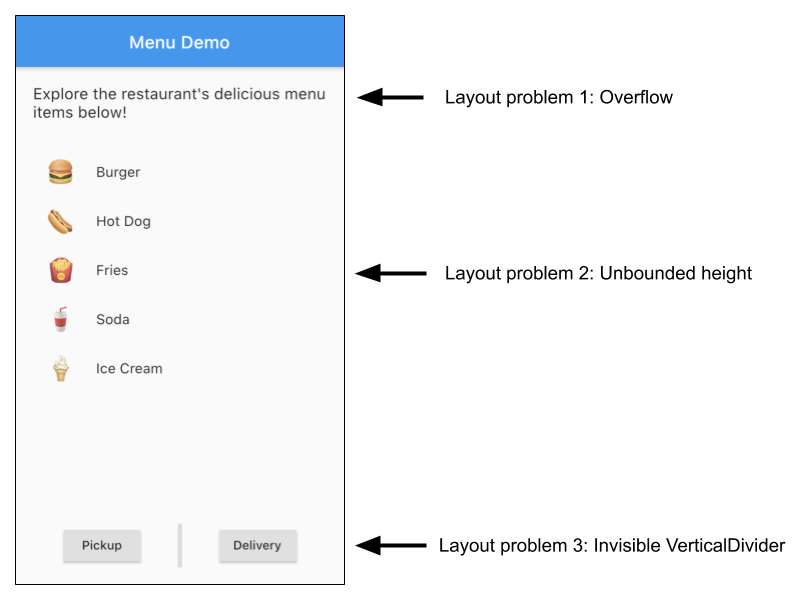
Let’s start with a demo app containing 3 layout problems that you will debug. You’ll use the Flutter Inspector to debug each issue separately, and combine the fixed issues at the end to complete a simple menu app that looks like the following screenshot
Use the following steps when approaching a layout issue. To help you remember, use the COIN acronym. Who coined this term? I did, just now.
-
Check the error message on the debug console to identify the error type and error-causing widget.
-
Open the Layout Explorer to visualize a
Flexwidget and its children. -
Inspect the size and constraints of the error-causing widget and its parent/children with the Details Tree.
Navigate back to your code and fix the issue.
It’s best if you follow along the rest of the article on your own computer. So, open your favorite text editor or IDE, and let’s go on this adventure together!
- Create a new Flutter project called
menu.
$ flutter create menu
-
Replace the
lib/main.dartfile content. Each layout issue is separated into its ownExample****class in the code, starting withExample1in the body of the app. Replacelib/main.dartwith the following code:
import 'package:flutter/material.dart';
void main() {
runApp(Menu());
}
class MenuItem extends StatelessWidget {
const MenuItem(this.icon, this.itemText);
final String icon;
final String itemText;
@override
Widget build(BuildContext context) {
return ListTile(
leading: Text(
icon,
style: TextStyle(
fontSize: 30.0,
),
),
title: Text(itemText),
);
}
}
class Menu extends StatelessWidget {
@override
Widget build(BuildContext context) {
return MaterialApp(
title: 'Flutter Demo',
home: Scaffold(
appBar: AppBar(
title: Text('Menu Demo'),
),
body: Padding(
padding: EdgeInsets.all(20.0),
child: Column(
children: [
// Modify code here
Example1(),
],
),
),
),
);
}
}
// Problem 1: Overflow error
class Example1 extends StatelessWidget {
@override
Widget build(BuildContext context) {
return Padding(
padding: EdgeInsets.only(bottom: 30.0),
child: Row(
children: [
Text(
'Explore the restaurant\'s delicious menu items below!',
style: TextStyle(
fontSize: 18.0,
),
),
],
),
);
}
}
// Problem 2: Viewport was given unbounded height error
class Example2 extends StatelessWidget {
@override
Widget build(BuildContext context) {
return ListView(
children: [
MenuItem('🍔', 'Burger'),
MenuItem('🌭', 'Hot Dog'),
MenuItem('🍟', 'Fries'),
MenuItem('🥤', 'Soda'),
MenuItem('🍦', 'Ice Cream'),
],
);
}
}
// Problem 3: Invisible VerticalDivider
class Example3 extends StatelessWidget {
@override
Widget build(BuildContext context) {
return Row(
mainAxisAlignment: MainAxisAlignment.spaceEvenly,
children: [
RaisedButton(
onPressed: () {
print('Pickup button pressed.');
},
child: Text(
'Pickup',
),
),
// This widget is not shown on screen initially.
VerticalDivider(
width: 20.0,
thickness: 5.0,
),
RaisedButton(
onPressed: () {
print('Delivery button pressed.');
},
child: Text(
'Delivery',
),
)
],
);
}
}
Run the app.
-
Open Dart DevTools.
Layout problem 1: Overflow error
When you run the app, you see a yellow and black diagonally striped box at the end of the line, similar to caution tape:
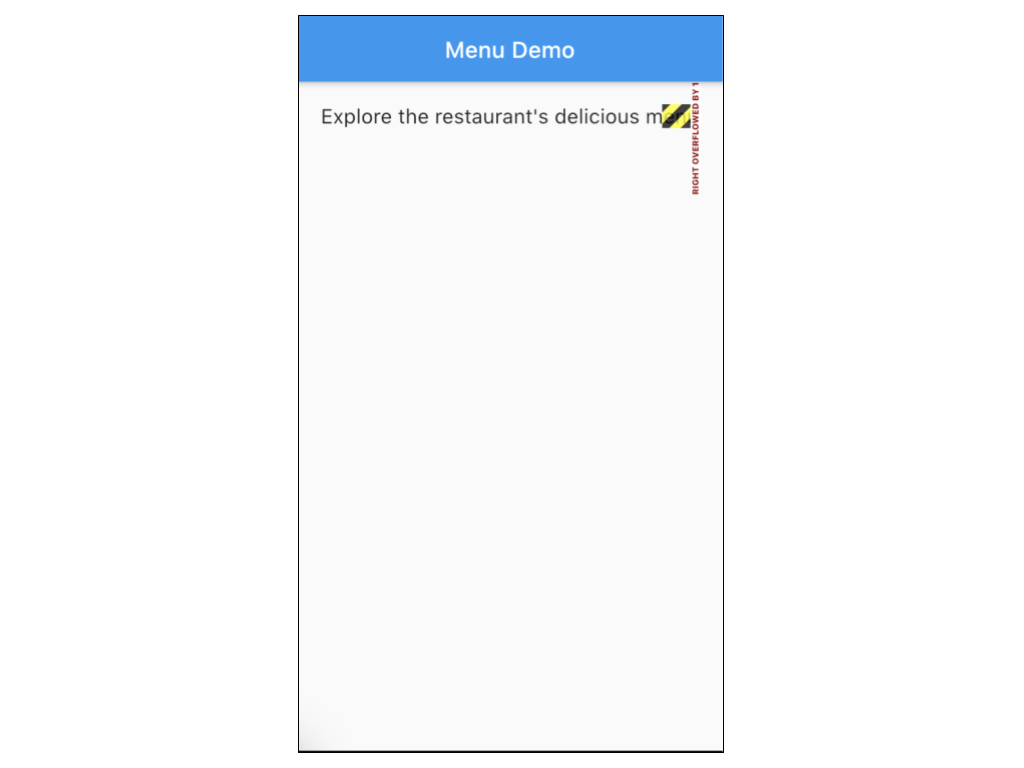
This means that there’s an overflow error — the most common Flutter layout error. Now, let’s follow the debugging steps to identify the problem and find the right fix.
1. Check the error message on the console.
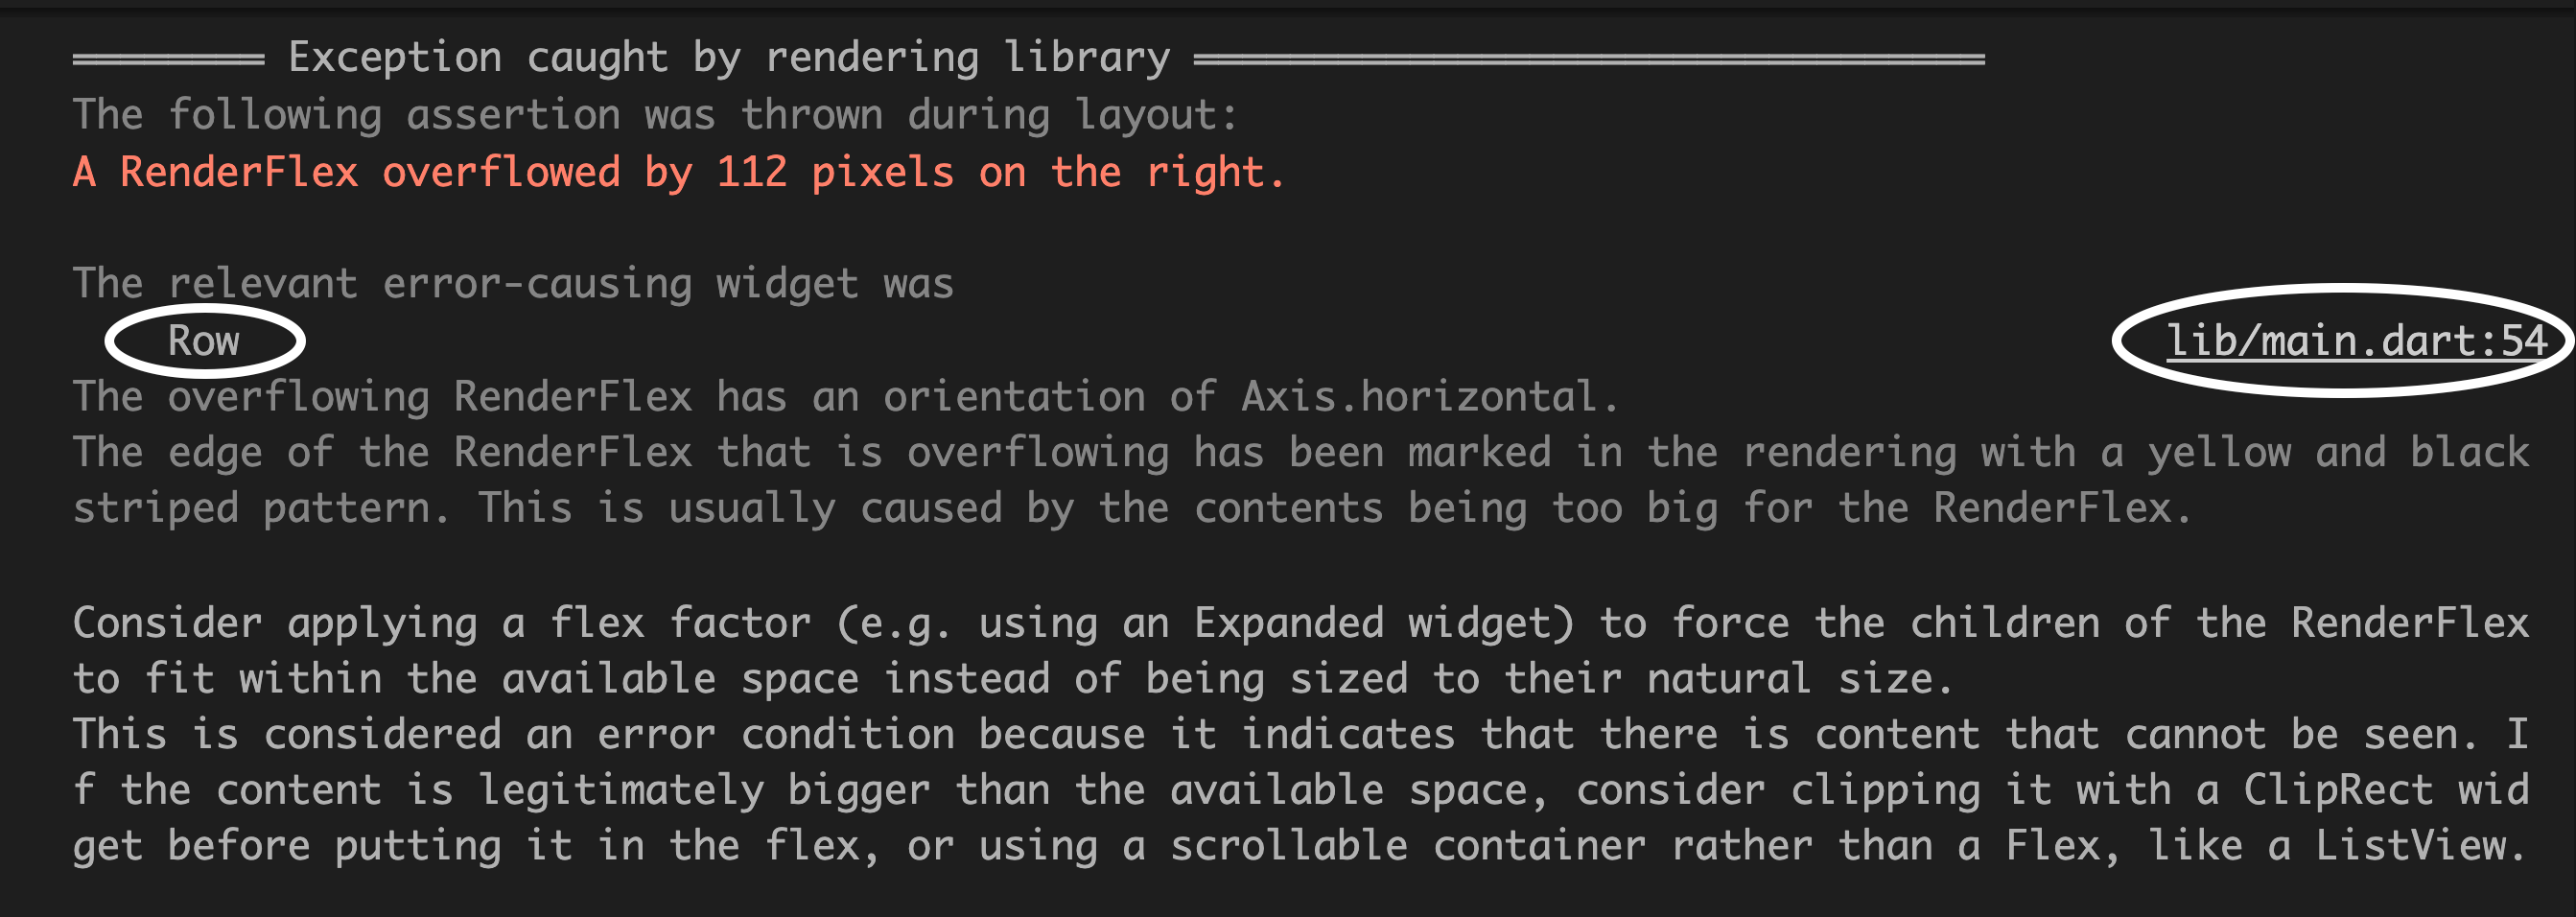
First, identify which widget is causing the problem The error message indicates that the Row
on line 54 of main.dart is causing the problem. Because Row is a Flex
widget (meaning thatRow extends the Flex class), you can examine it with the
Layout Explorer.
2. Open the Layout Explorer.
Navigate to DevTools and open the Layout Explorer tab.
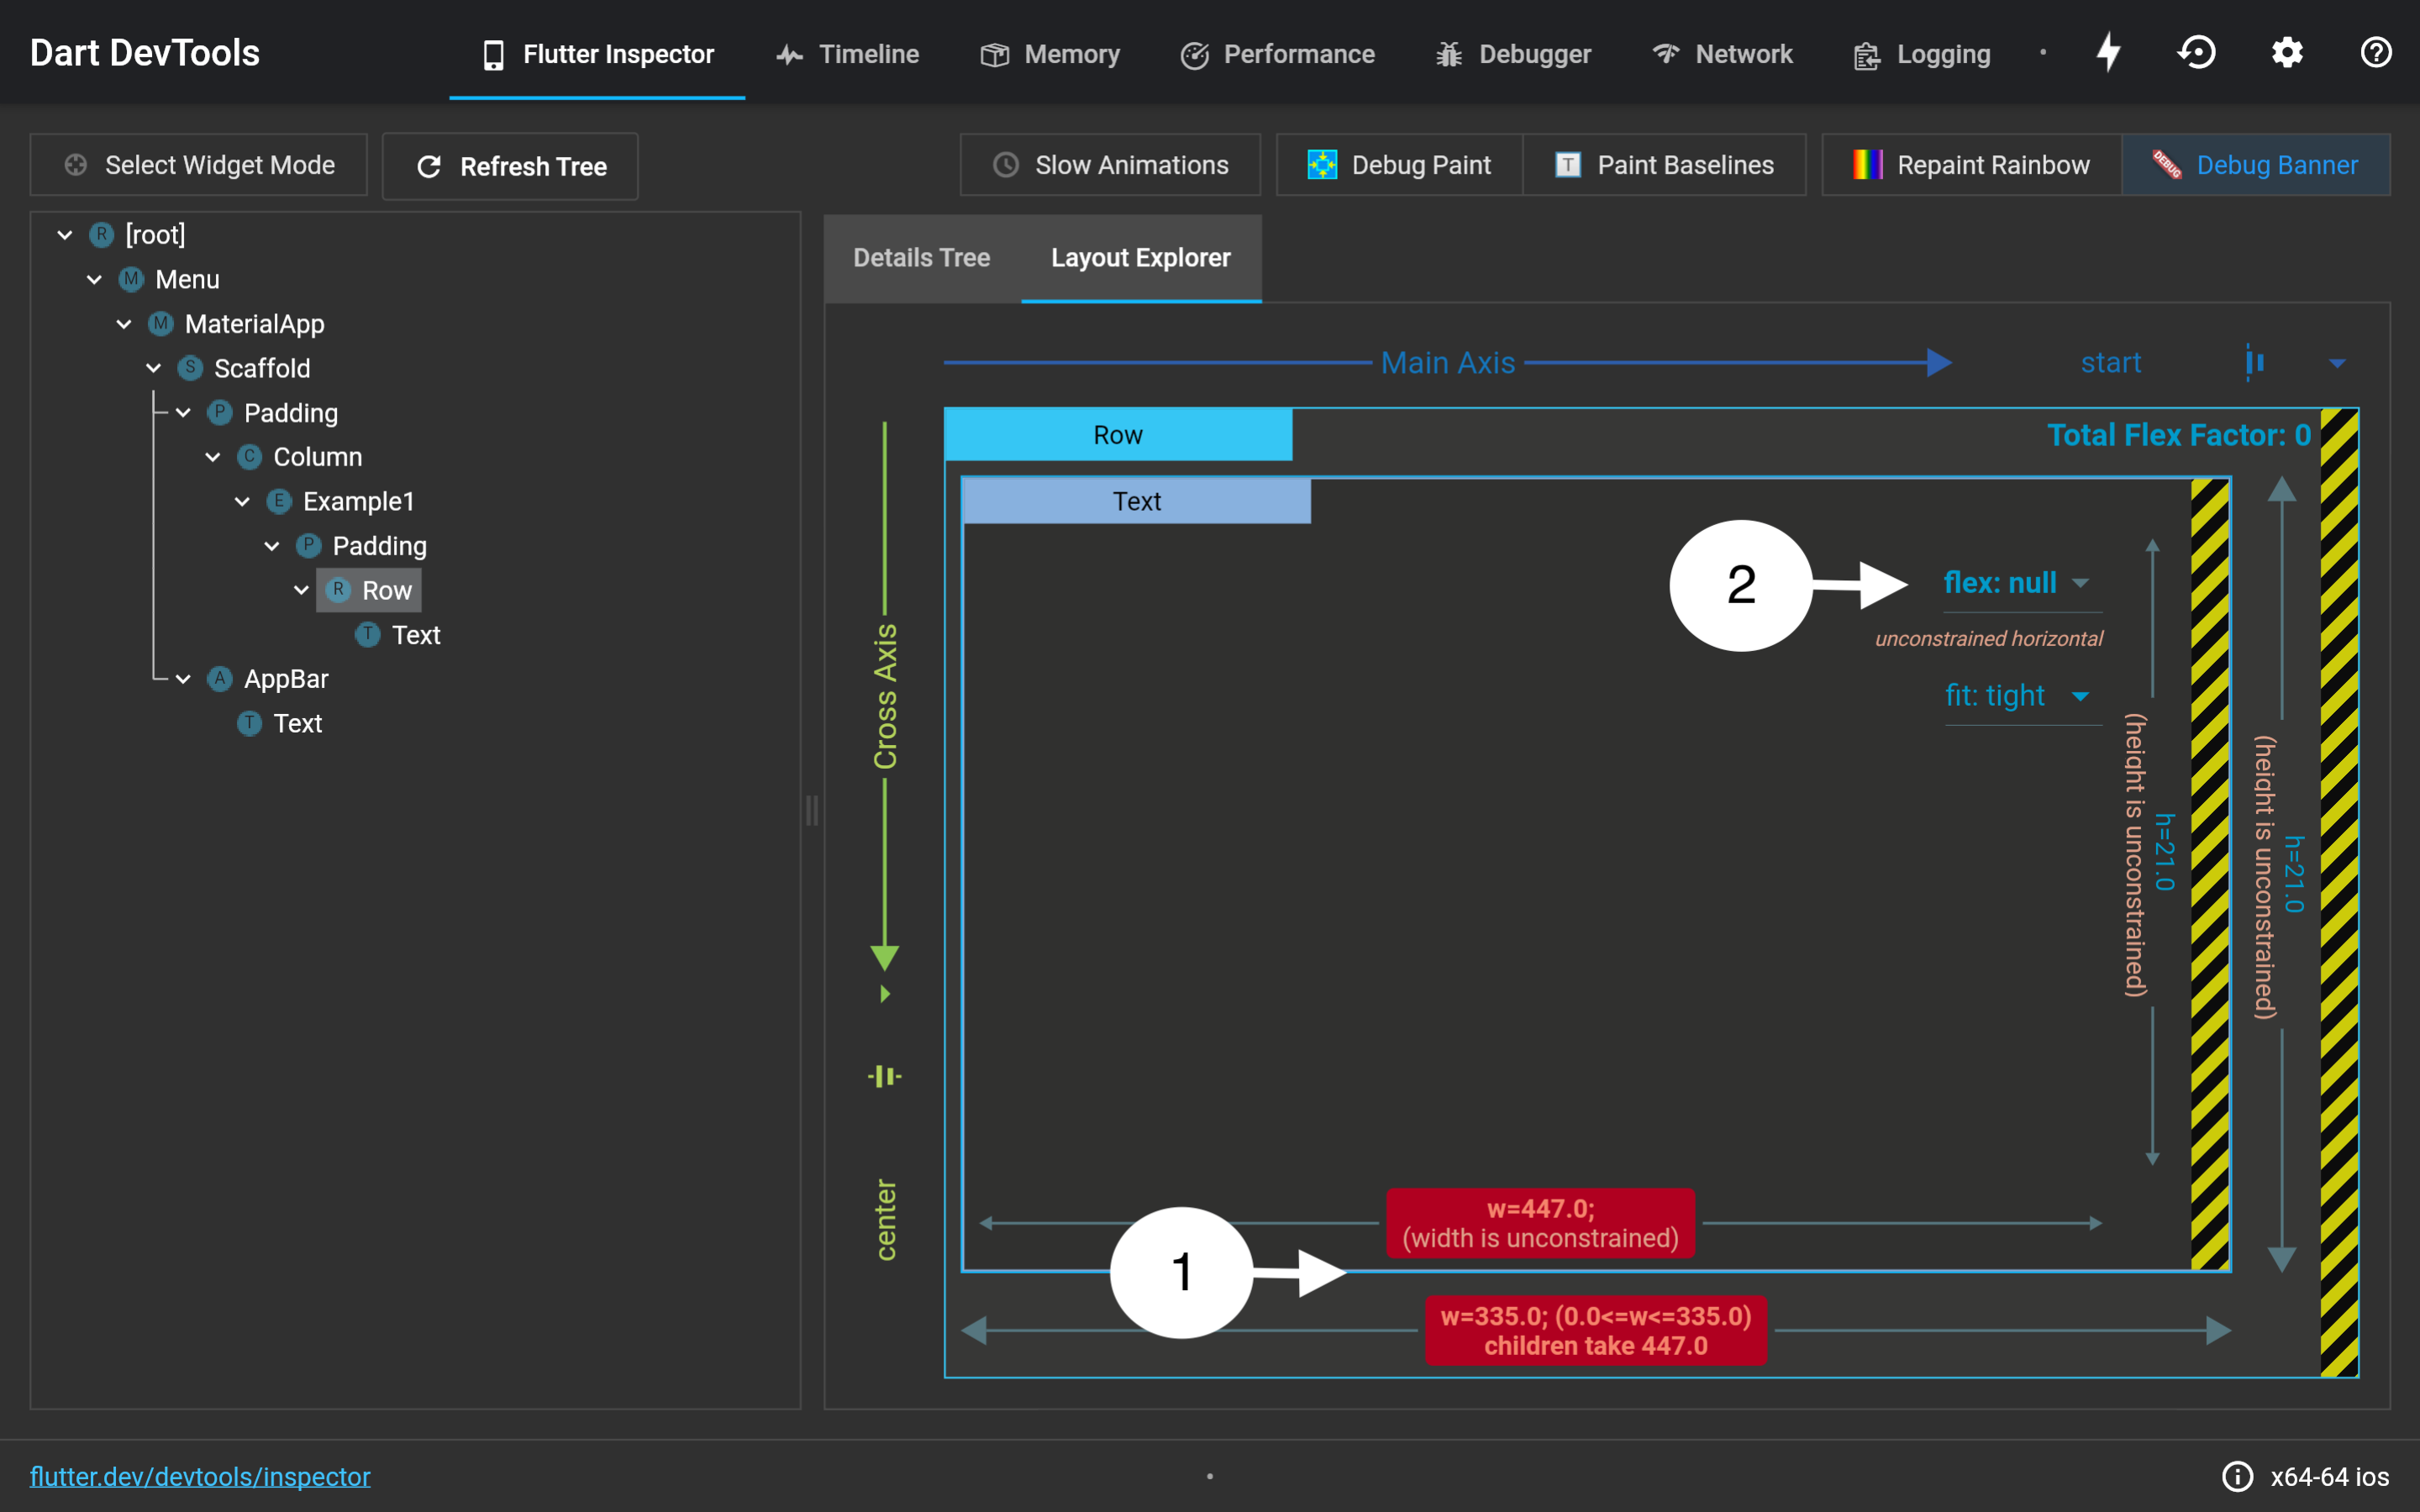
Click Row. (The numbers on the image correlate to the following steps.)
-
Red banners appear at the bottom, indicating that something is wrong. When you take a closer look at the banners, you realize that Text (width = 447) is wider than the parent widget, Row (width=335), causing the overflow error.
-
You need a way to tell Text that it can only be as wide as Row and no more. Try adjusting the flex of Text to 1. (This is similar to wrapping
TextwithExpanded.) As a result, the Text shrinks, and the red banners disappear. Phew, it looks like it’s fixed. Not quite! You still have to update the code because the tool doesn’t touch your code. It just shows what would happen if you changed some layout properties.
Aside: You might wonder, why aren’t all of
Row’s andColumn’s childrenExpandedby default? The Flutter team made that design decision. If all the children wereExpandedby default, it creates other layout problems like some children being too squeezed or stretched.
3. Inspect the size and constraints with the Details Tree. In this scenario, you can skip this step because the problem has been identified.
4. Navigate back to the code and fix it.

Wrap Text with Expanded. The default flex is 1, so you don’t have to specify this property.
Layout problem 2: Unbounded height error
Let’s move on to the next example by replacing Example1() inside the Column with Example2()
and hot reloading.
Column(
  children: [
    // Modify code here
    Example2(),
  ],
)
Nothing displays on the app, despite having a ListView with various menu items in the Example2
class:
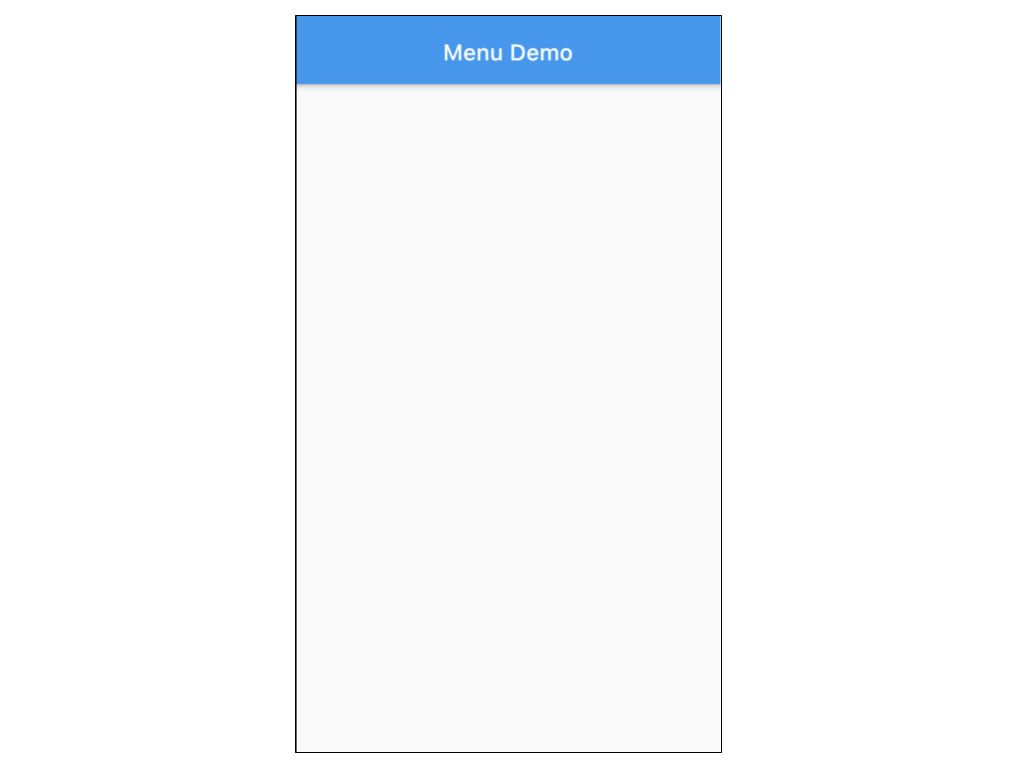
What’s going on?
1. Check the error message on the console.
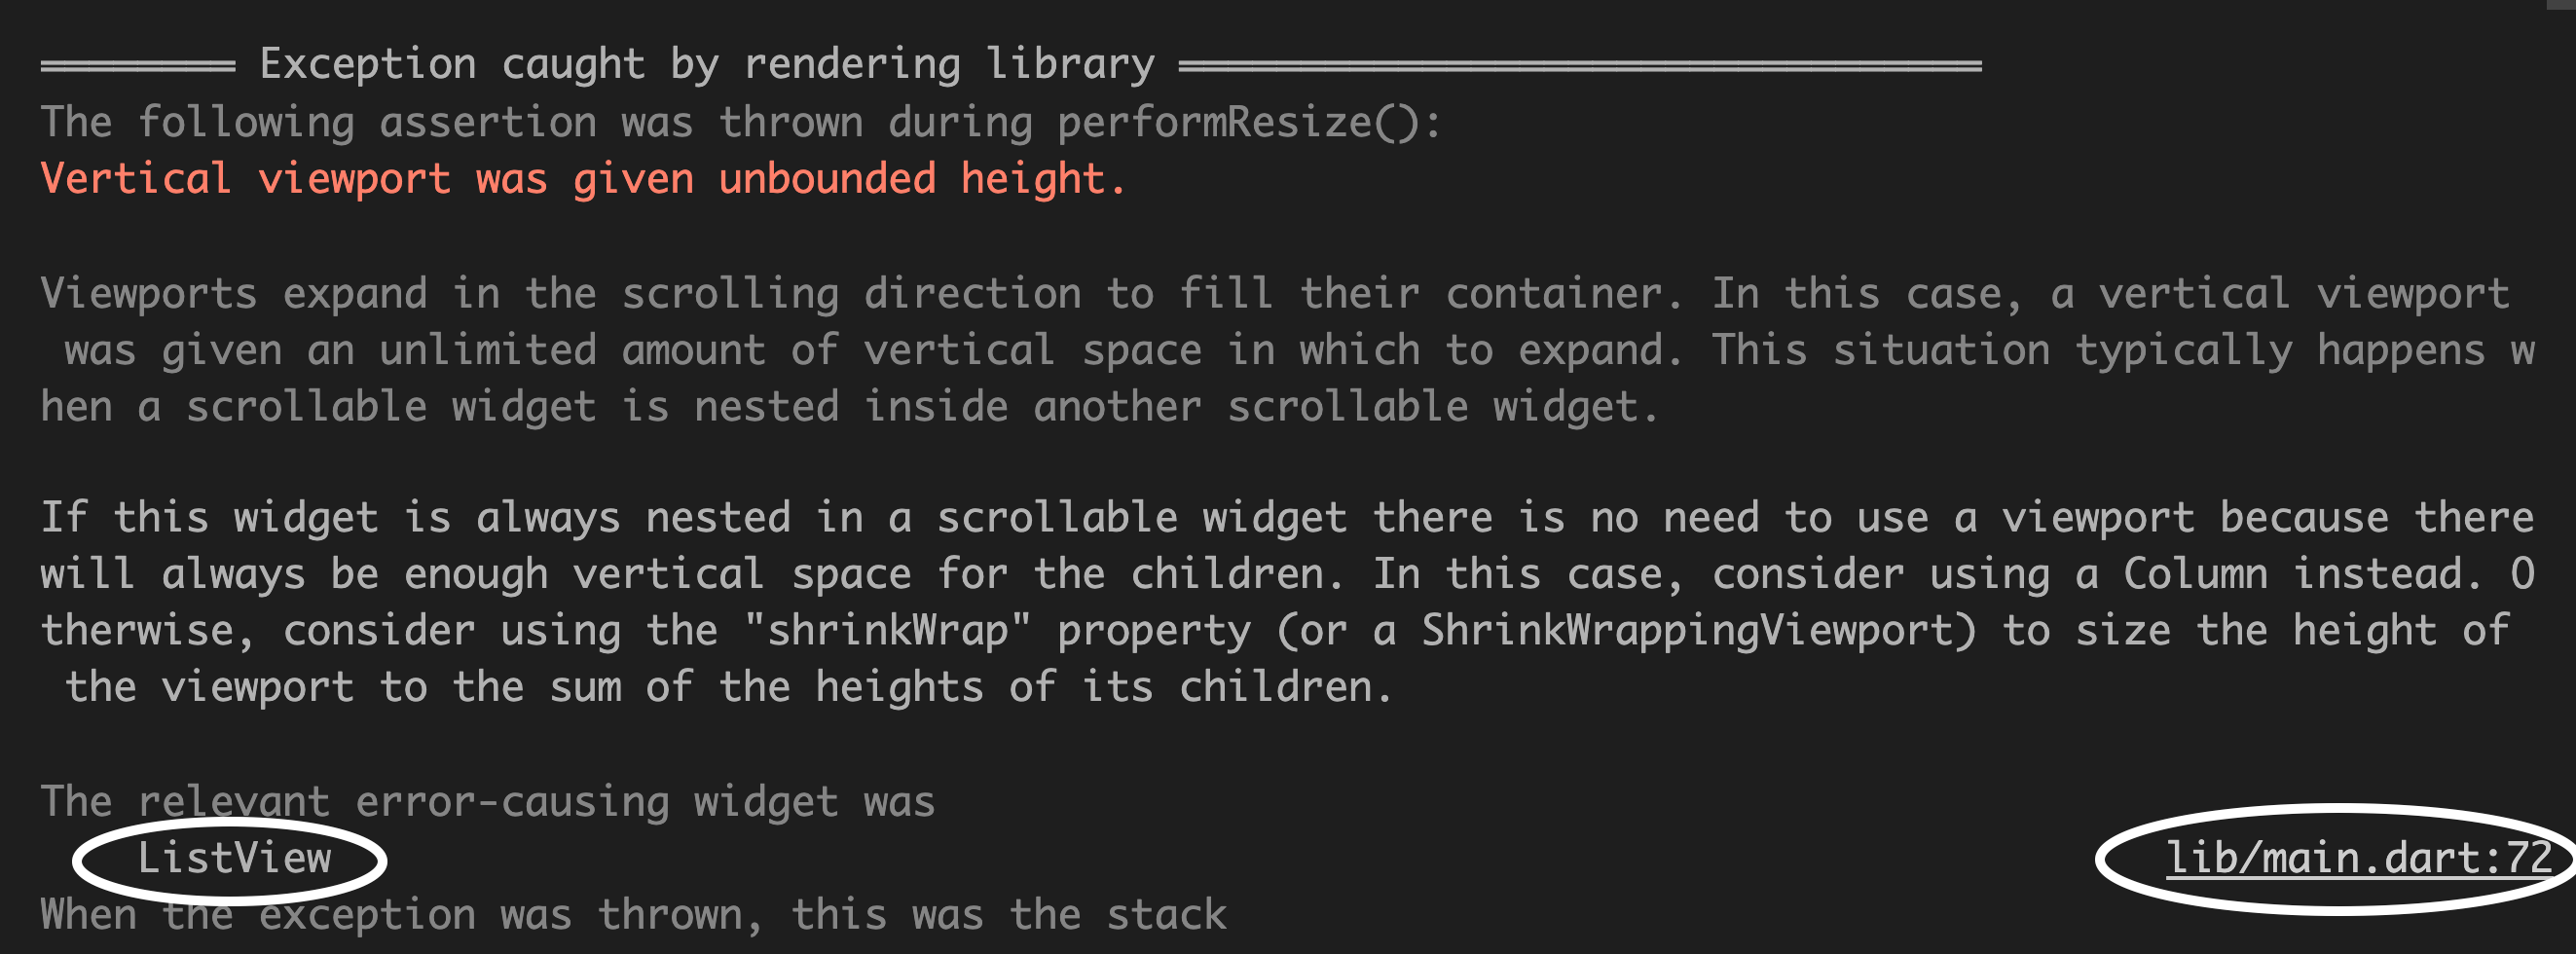
ListView on line 72 of main.dart is causing the “Vertical viewport was given unbounded height” error. At first glance, the terms
vertical viewport and unbounded are unclear, so continue to the next step.
2. Open the Layout Explorer.
Navigate back to DevTools and open the Layout Explorer tab.
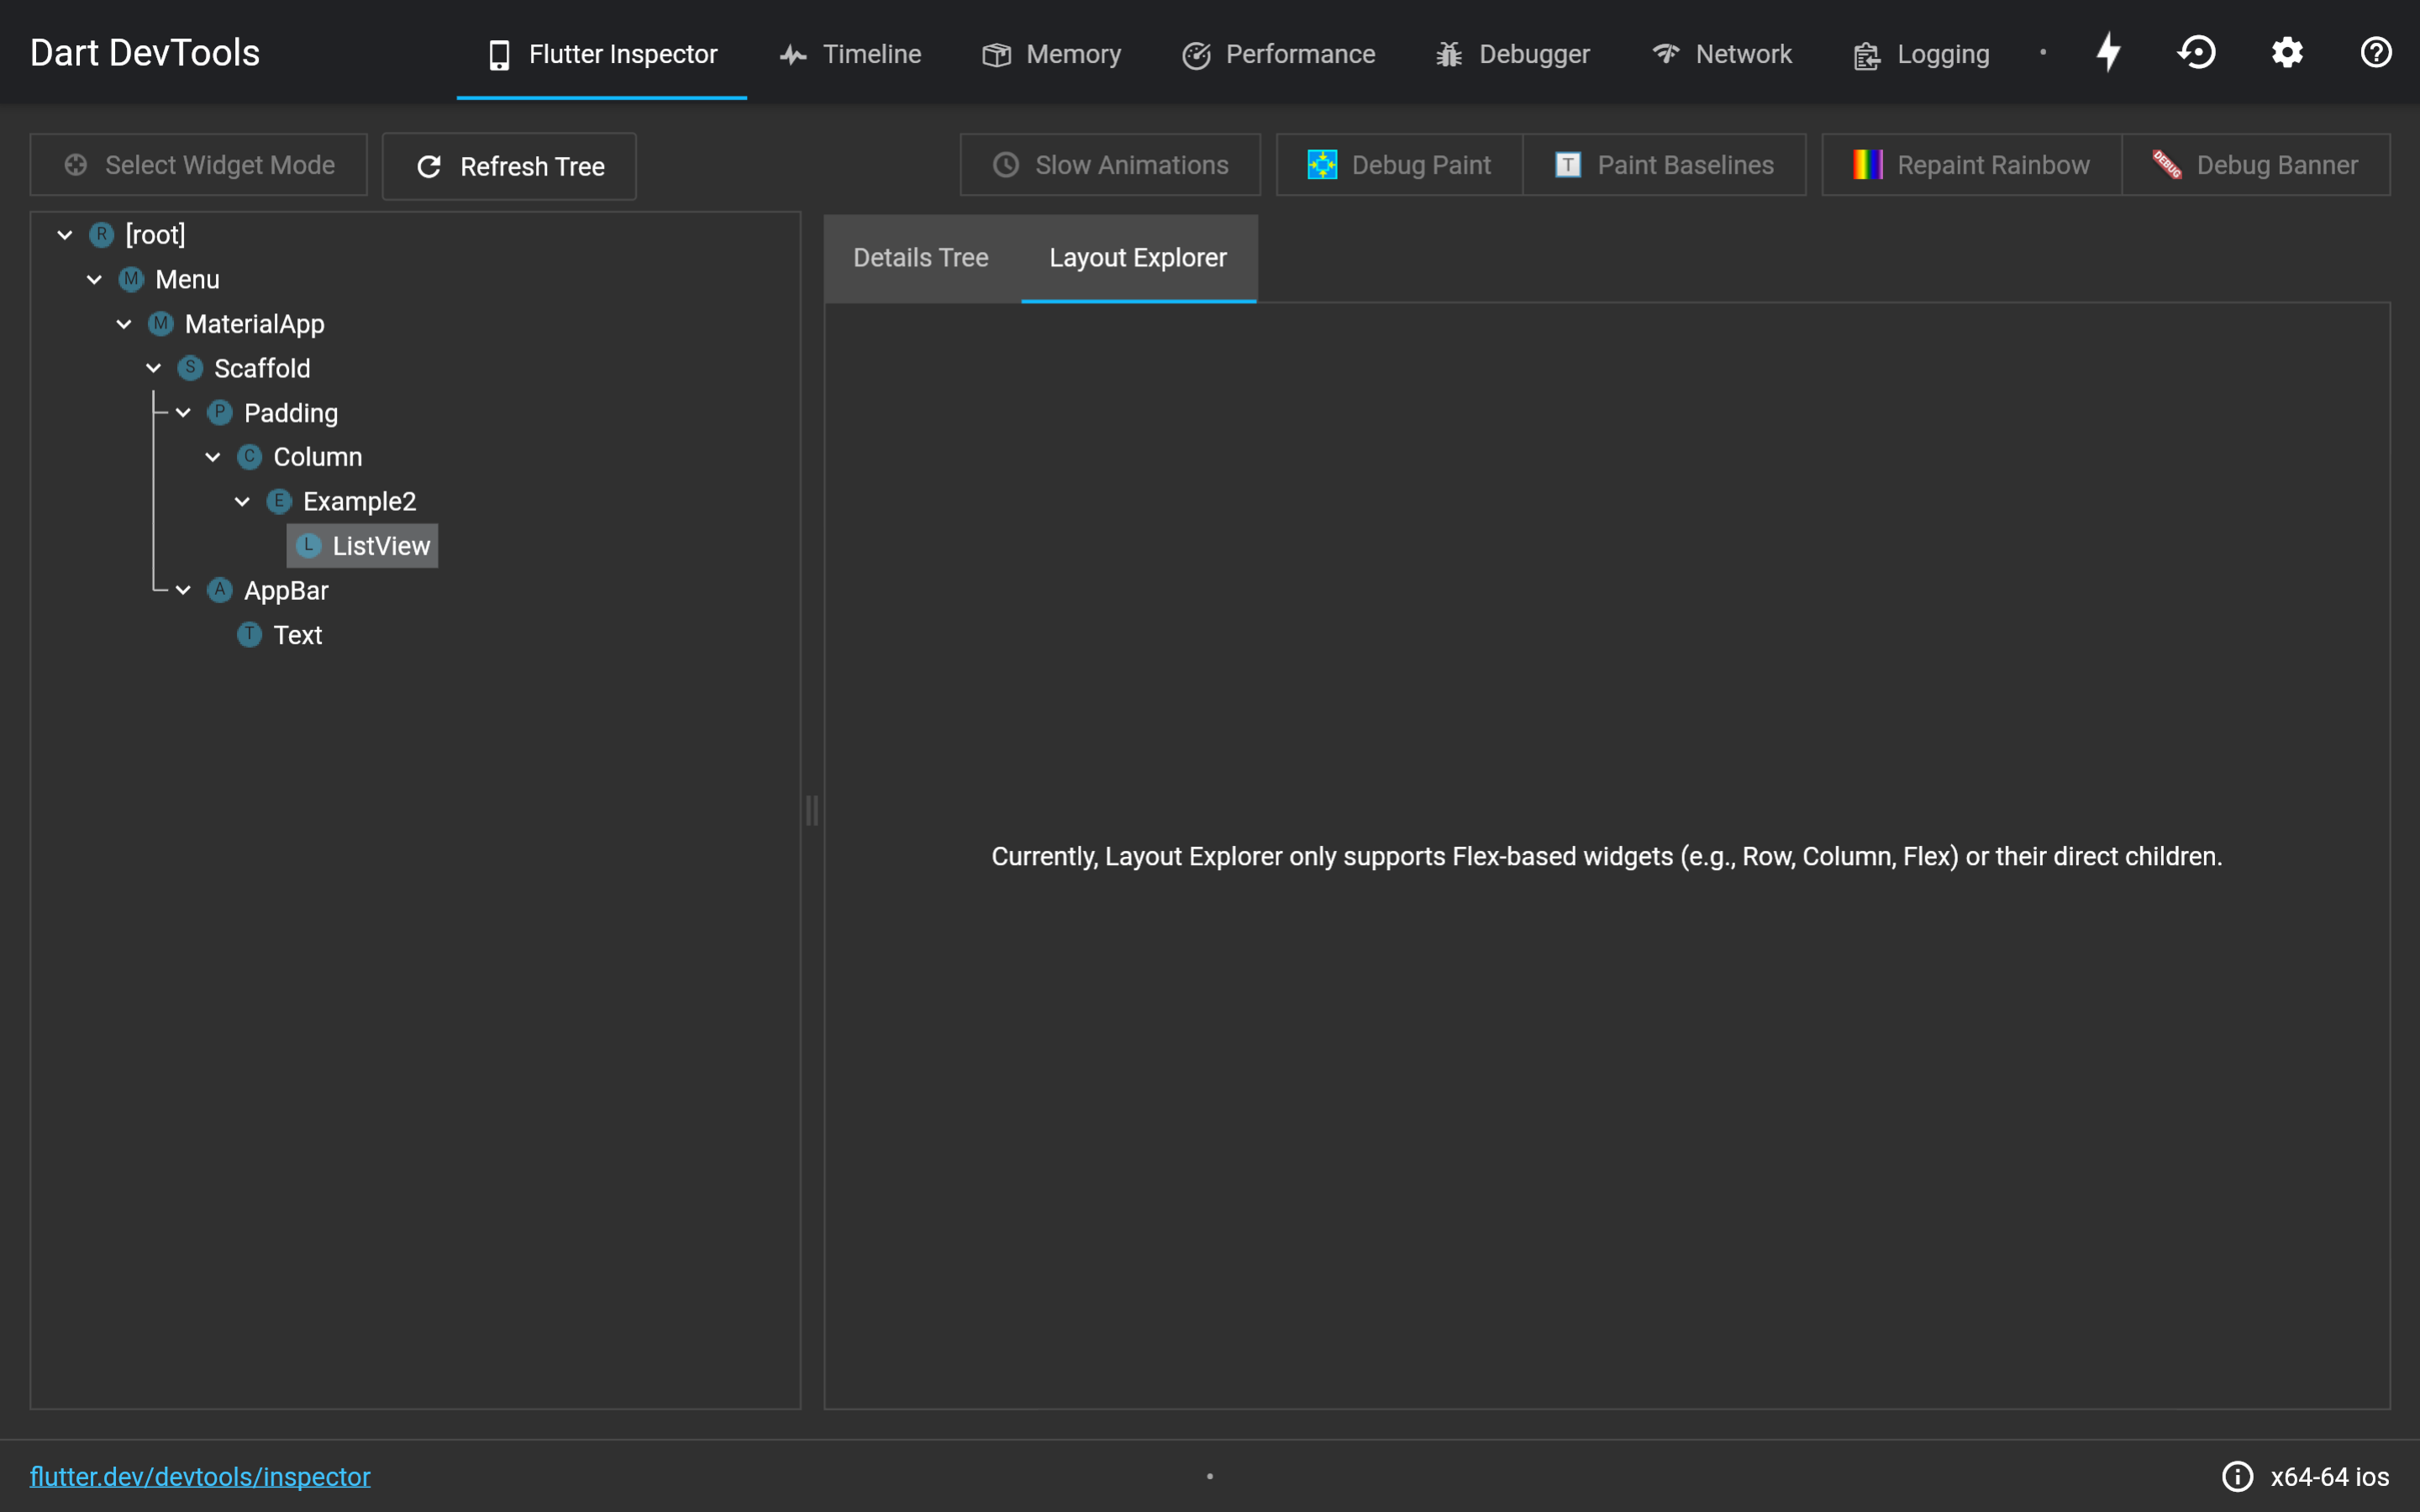
Refresh the tree by clicking on the refresh icon at the top. Nothing appears after clicking ListView
because the Layout Explorer only supports Flex widgets and their direct children. Interestingly, clicking
Example2 and Column doesn’t do the trick either — the Layout Explorer
is still blank. Move on to the next step.
3. Inspect the size and constraints with the Details Tree.
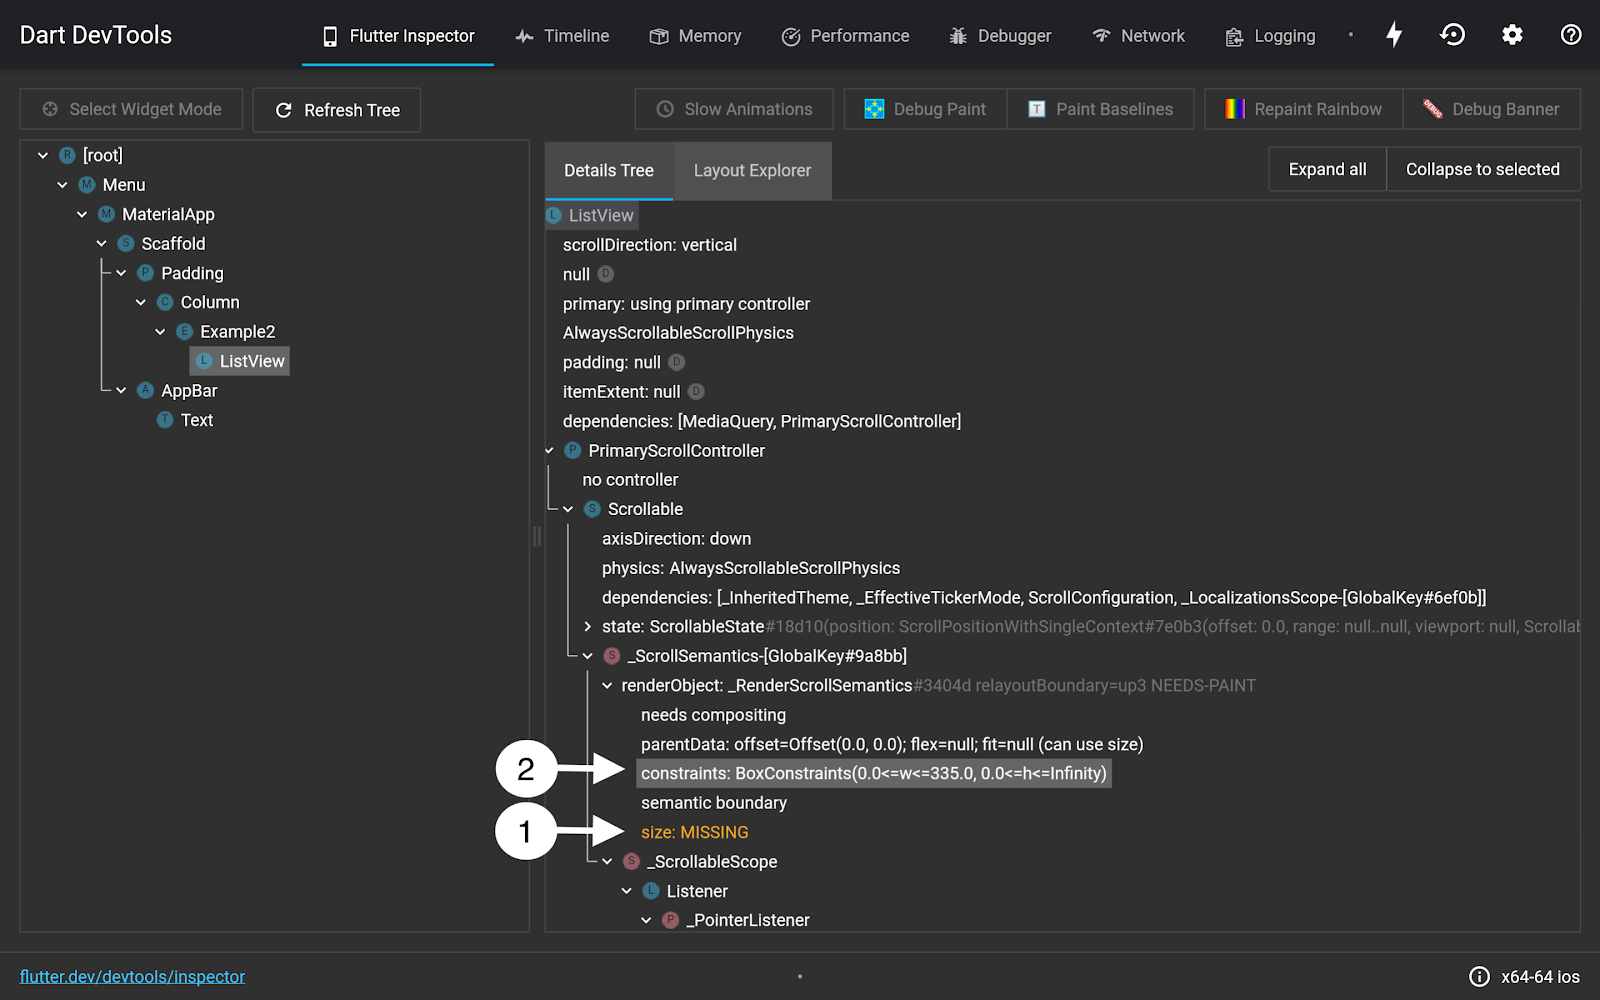

Expand ListView’s first renderObject, which contains the information for painting the widget.
-
The orange text indicates the size is missing — no wonder the
ListViewis missing from the app. -
After looking at the
constraintsproperty, notice that the height constraint is listed as infinity. The error message makes more sense now.ListViewis a “viewport” given an unbounded — in other words infinite — height in its scrolling direction.
Constraints are passed down from the parent widget. So, here’s a snapshot of how the widgets determine their constraints:
Column: Take up as much height as you want.
ListView: Okay, I’ll take up all the space.
Column: Whoa, but that’s like infinity, dude.
And, the widgets don’t know what to do … size can’t be determined because ListView wants infinite height, which can’t be depicted on screen.
Aside: Why doesn’t
Columnjust limit the height of its children to its own height? You can end up in a situation where the first child takes up all the space, forcing the second child to have 0 height. And you wouldn’t immediately know about it because no errors are thrown.
4. Navigate back to your code and fix it.
class Example2 extends StatelessWidget {
  @override
  Widget build(BuildContext context) {
    return Expanded(
      child: ListView(
        ...
      ),
    );
  }
}
Remember from earlier that wrapping a widget with Expanded gives it a bounded constraint along the parent’s main axis
(width for Row, height for Column). In this case, the parent is Column, so
Expanded provides a height constraint. Wrap the ListView with Expanded, and hot reload to see the list show up on the app.
Layout problem 3: Invisible VerticalDivider
Now, replace Example2() in the Column with Example3().
Column(
  children: [
    // Modify code here
    Example3(),
  ],
)
Take a close look at the Example3 class in the code. Notice that the VerticalDivider
exists, but only two buttons appear on the app after hot reloading:
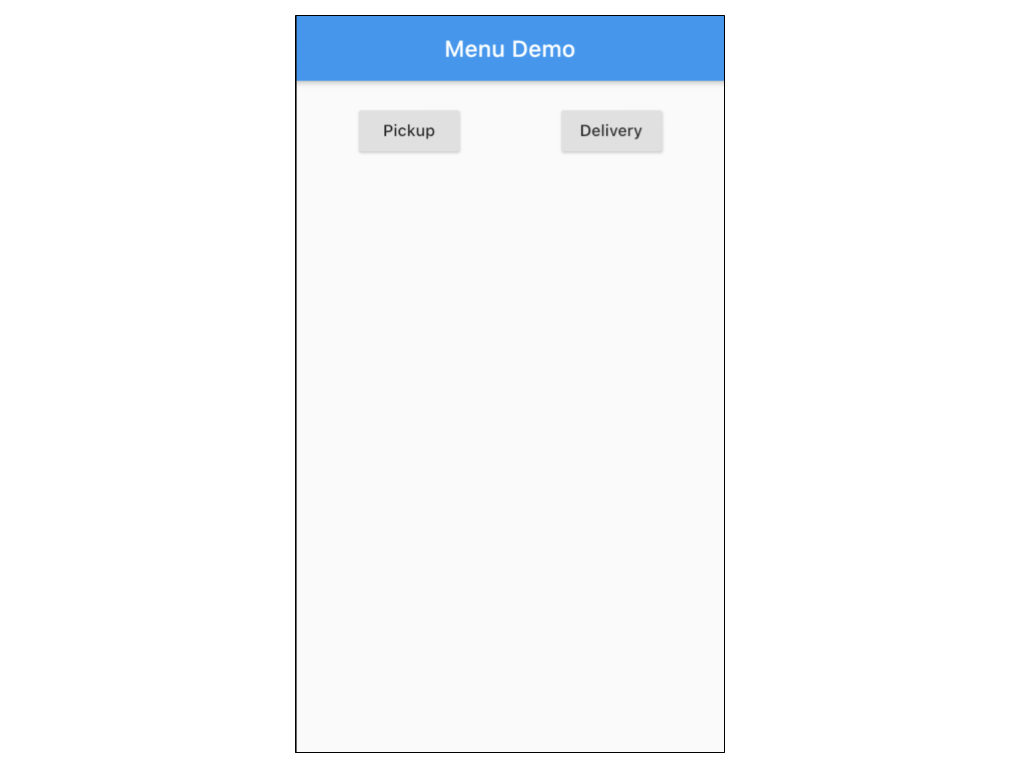
Why is the VerticalDivider invisible?
1. Check the error message on the console. You didn’t get any error messages this time. Continue to the next step.
2. Open the Layout Explorer. Navigate back to DevTools and click on the Layout Explorer tab.
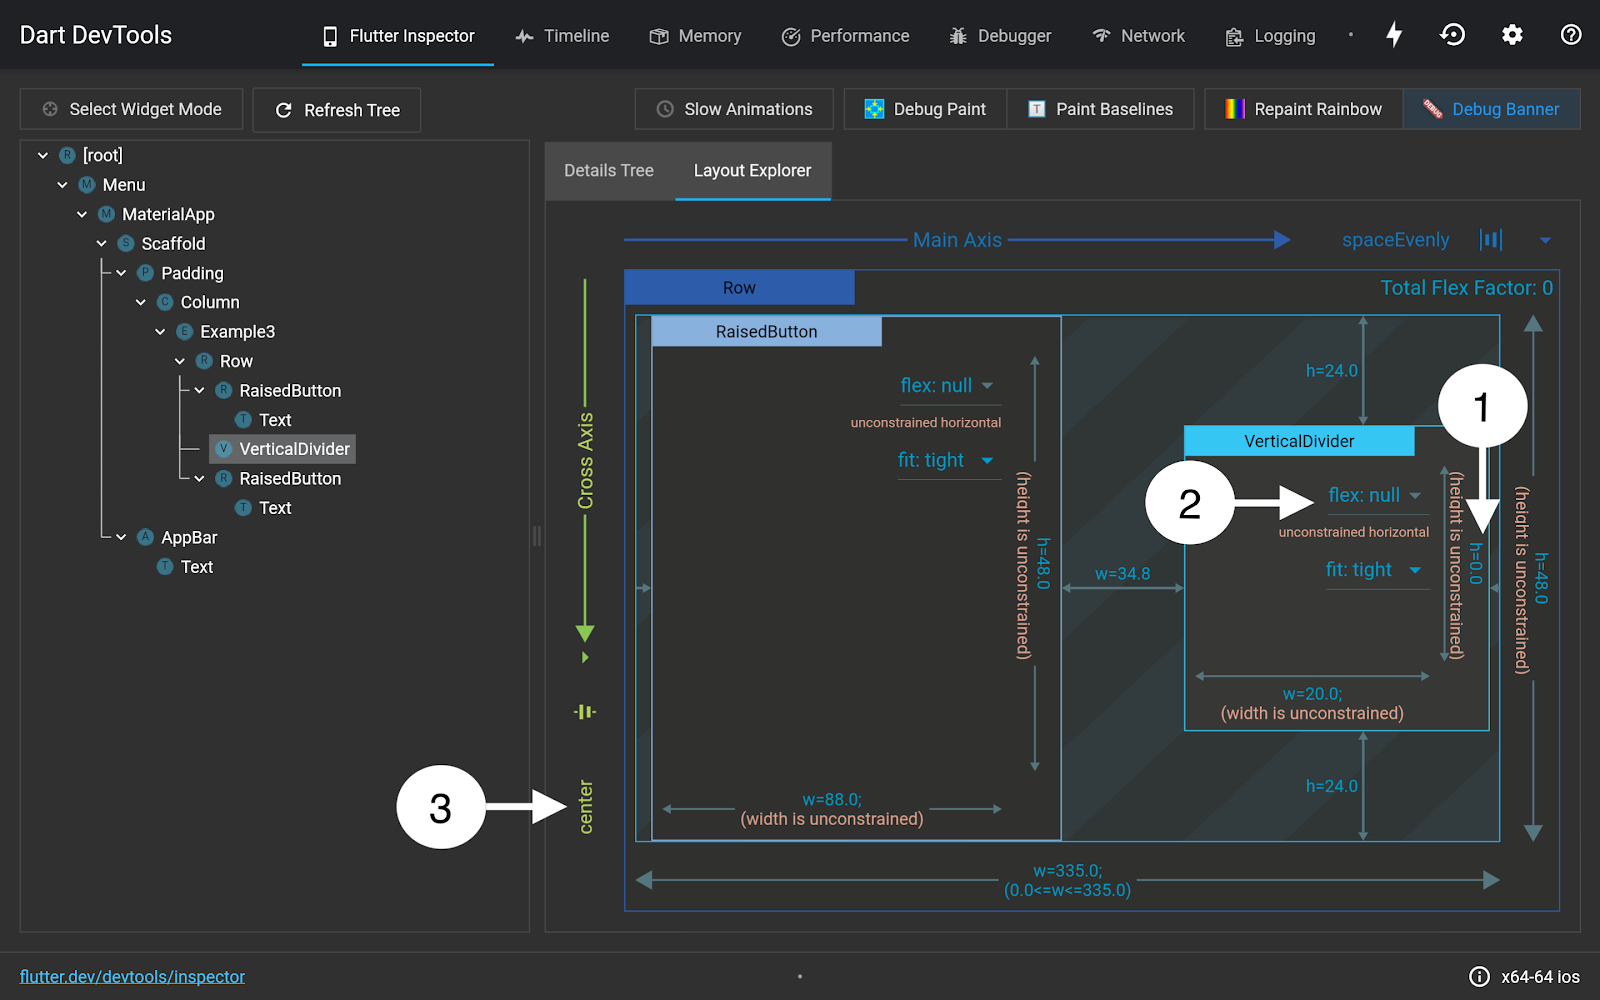
After refreshing the tree, click VerticalDivider and scroll to the right side of the Layout Explorer. Observe that VerticalDivider’s width and height are unconstrained.
-
Notice that the VerticalDivider’s height is 0, which explains why it isn’t displayed on the app.
-
Toggle the flex to 1, like you did before. The height remains 0. Wrapping a
VerticalDividerwithExpandedwon’t do the job in this case becauseExpandedprovides a width constraint, instead of a height constraint. -
The next thing you might try is to stretch the height of the divider to the height of the raised buttons, so try setting the cross-axis alignment to stretch. The height remains 0, so move on to the next step.
3. Inspect the size and constraints with the Details Tree.
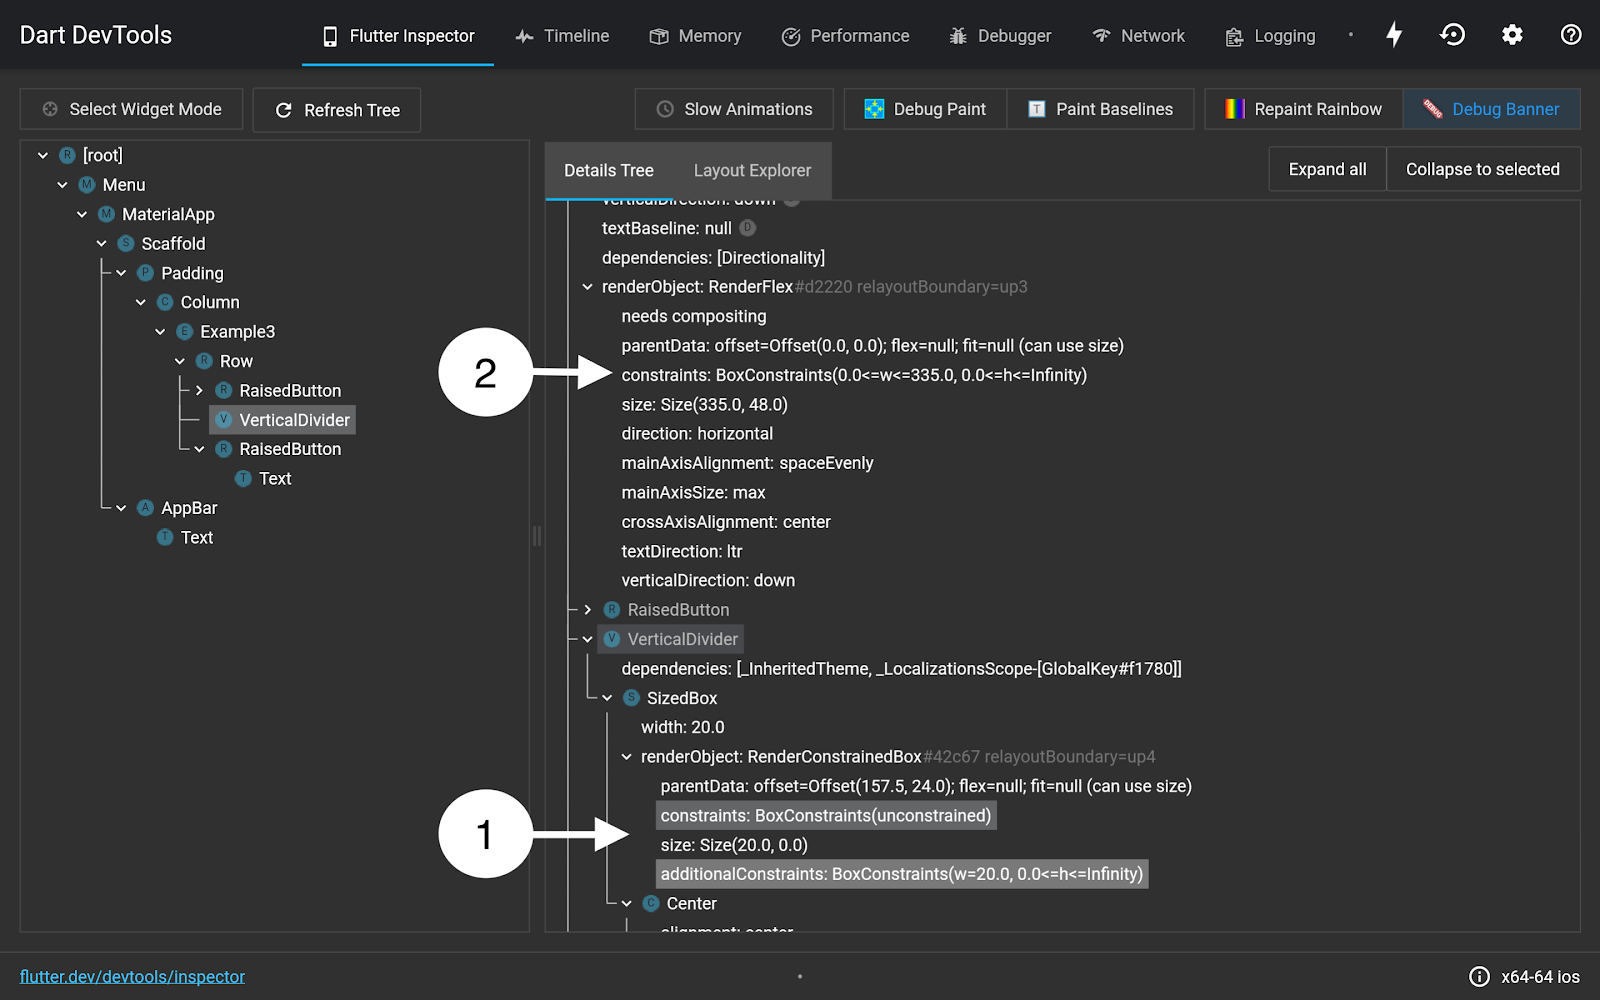
-
Open the first
renderObjectunderVerticalDivider. The constraints property indicates that the widget has neither width nor height constraints, matching what the Layout Explorer displays. But, underadditionalConstraints, the width is 20 (as explicitly defined in the sample code), but height still has no constraints. The width isn’t the problem here, so let’s focus on the height. -
Go up to the parent widget,
Row, and open therenderObjectto see thatRowalso doesn’t have a height constraint.
Why?
The most important thing to remember is that constraints are passed down:
Column tells Row: Choose any height you want.
Row tells VerticalDivider: Choose any width you want. Because Column
told me to choose my height, you can also choose your own height.
VerticalDivider: The width property is passed in, so my width is 20. I can choose my height, so I’ll default to 0.
4. Navigate back to your code and fix it.
class Example3 extends StatelessWidget {
  @override
  Widget build(BuildContext context) {
    return SizedBox(
      height: 50.0,
      child: Row(
        ...
      ),
    );
  }
}
For VerticalDivider to have a height, a height constraint must be given. Wrap Row
in SizedBox and give it a fixed height of 50.0. Doing so forces Row to pass a height constraint to the
VerticalDivider.
Hot reload. Voila! VerticalDivider pops up on the screen.
Aside:
VerticalDividerbehaves differently fromListViewbecause of their unique definitions. When told to choose their own heights,ListViewwants to be as tall as possible whereas theVerticalDividerwants to be as short as possible. But, both need a height constraint to properly appear in the app!
Now, let’s put the fixed code from all 3 examples together inside the Column:
Column(
  children: [
    // Modify code here
    Example1(),
    Example2(),
    Example3(),
  ],
)
Hot reload. Congratulations, you completed the menu app!
Summary
Through this tutorial, you learned:
Constraints are passed down the widget tree.
-
Expanded****provides bounded constraints to aRoworColumn’s child. Flutter Inspector is your best friend when dealing with layout issues.
To learn more, check out understanding constraints on flutter.dev.
Happy debugging!
About the author: Katie is a rising senior at University of Michigan studying Computer Science. She’s currently an intern on the Flutter Developer Relations team, helping developers learn and build awesome apps. To see what she’s up to, visit her GitHub and LinkedIn.
More from Flutter

Best practices for optimizing Flutter web loading speed
As a Flutter developer working with the Google Flutter team and personally in my private time, I encounter and understand the concerns…

Learn Flutter for free with Flutter Apprentice!
A free book for learning Flutter, available for a time-limited period.
